The Backyard's weekly bird walks will be resuming on Tuesday, September 8th and Sunday, September 13th. Locations will be posted once decided.

Showing posts with label Bird Tips. Show all posts

Tuesday, 7 February 2023

Nesting Season is Coming

 As we anticipate Spring's arrival it's time to make sure our nest boxes are ready. Soon the chickadees and wrens will begin to search for and establish territories, then begin nesting. Before they start it's best to have your nest box clean and ready for new tenants. 

Not all birds use nest boxes. The Anna's Hummingbird, for example, builds tiny cup-shaped nests in shrubs and trees. Unlike other birds, the Anna's nest earlier, in mid-February, and their young should be out and flying around before the end of March.


Anna's Hummingbird in Nest - K. MacDonald

Common cavity nesters in backyards are the Bewick's Wren, Chestnut-backed Chickadee, Red-breasted Nuthatch, Tree and Violet-green Swallows, and all species of woodpeckers. Equally common but less welcome are the European Starling and House Sparrow. These birds naturally build their nests in cavities that have been excavated by woodpeckers or through other means, but will also use nest boxes that we provide, especially if natural cavities are scarce or have been removed. 

Northern Flicker in Cavity Nest - S. Petersen

Nest boxes have a few requirements that should be considered in order to make sure it's beneficial for the birds. The entrance hole size determines who can get in and making it too big can allow predators or unwelcome birds inside. If you are wanting to attract smaller birds like chickadees and wrens, having the entrance hole be 1" keeps other birds out while still allowing them inside. Enlarging the hole from 1" to 1 1/8" lets nuthatches use it as well. Entrance holes of 1 3/8" are useful for these smaller birds as well as swallows and House Sparrows. To keep the sparrows and starlings out, swallow boxes can be made with an oval hole. The oval should be 7/8" high and 3 1/2" wide. Swallows can rotate their shoulders and make themselves flat while the starlings and sparrows cannot. The smallest woodpecker in our area, the Downy Woodpecker, uses an entrance hole of 1 1/4", while the larger Hairy Woodpecker can use a 1 1/2" hole. Northern Flickers need a hole size of 2 1/2" in their nest boxes. Once difference between woodpecker nest boxes and other nest boxes is that woodpeckers excavate cavities and we need to emulate this in their boxes. Filling woodpecker nest boxes with wood chips allows them to imitate the excavation and makes them more likely to use your box.


Oval Hole Swallow Box

The size of the floor determines how much energy the birds will have to use and how much work they do to build their nests, so bigger isn't always better. The height of the box is also important, as well as the distance from the bottom of the box to the entrance hole. Having a deeper box helps keep the eggs and young out of the hands of predators, and the birds will build their nests inside to the height they want from the hole. Nest boxes for chickadees, wrens, and Downy Woodpeckers are best made with a floor of 4"x4", or 5x5" max with the hole around 6" above. Adding something to the back of the door such as grooves or strips of wood can help act as a ladder and help young birds climb out when they are ready. Swallow or Downy Woodpecker boxes should also have the entrance hole around 6" above the floor, though the ideal floor for these boxes is 5"x5". The box for a Northern Flicker should have a floor size of 8"x8" with the entrance hole 10-12" up. 


Ladder on nest box door

Ventilation is a must, whether it's holes drilled in the sides or other ways to allow airflow. Birds have difficulty cooling down so making sure there's decent airflow to keep heat down is vital. Placing the box somewhere shadier or where it gets limited sunlight during the day can help keep it cool as well. If you decide to paint your box, go with light colours to reflect some heat. 

You also need to consider cleaning. Being able to clean out the nest box when nesting season is over is an important part of having a nest box you want to use more than once. Make sure whatever box you have has an easy way to get inside to clean it out. Cleaning your box can help keep small bugs and parasites from infesting the box. Remove the nest each year and give the box a quick brush out. If you notice mold or rotting, it may be time to replace the box. A solution of 9 parts water to 1 part bleach can be used to kill mold, just make sure the box is given time to completely airdry to avoid encouraging more mold or bugs. Sometimes bees may attempt to build their hives in your box. Use a bar of soap and rub the inside walls of your box to leave a thin layer that the bees nest will be unable to adhere to. Check your nest boxes even if you don't think they were nested in, as some birds will leave debris in boxes to keep other birds from using them. 

Often we see nest boxes with little perches, but we do not recommend adding one. Perches allow predators to sit and attack the adults and young in the nest box. The birds in the box can easily get in and out without the use of a perch. 

When placing your nest box, try and put it somewhere where wind and rain do not blow directly into the box. Also consider the type of bird you are wanting to use the box and make sure you place it in a location that appeals to them. For example, chickadee boxes should be near trees or shrubs they can dart in and out of, while swallow boxes should have open space around them to allow the birds to swoop in and out. The boxes don't need to be mounted very high, 6-12ft. off the ground works just fine for anything except a bat box. Try and keep nest boxes at least 20ft. from bird feeders with the entrance hole turned away to avoid interference between the two. 

The most important thing when placing a nest box is to make sure you put it somewhere you can see it. Adding a nest box to your backyard can be very entertaining, and watching the young fledge cannot be missed.

Good birding!


Saturday, 17 December 2022

Can I Feed the Birds Yet?

Avian Flu Update for December 2022

As of December 2022, the avian flu is still very low risk for transmission to songbirds.

Our research from reputable sources such as Bird Studies Canada, the Cornell Lab of OrnithologyEnvironment and Climate Change Canada, and the Canadian Food Inspection Agency concludes that there is currently still very little to no risk of songbirds catching avian flu.

It is safe to continue feeding your backyard birds as long as you do not have poultry, or waterfowl  visiting your feeders. Just be sure to keep the area clean and disinfect feeders once a week with a 10% bleach solution, or a 50% cleaning vinegar solution (industrial white vinegar found in hardware stores, different from cooking vinegar) and remove any old bird seed on the ground. If you do have backyard chickens but keep them at a distance from your wild bird feeding area, you can continue feeding but we recommend you be careful to keep your chickens and backyard birds well away from each other.

Wednesday, 7 December 2022

Keeping Your Hummingbird Feeder from Freezing

Hummingbird feeders are an important supplementary energy source for hummingbirds, especially in the current weather conditions. With the low temperatures, it can be hard to keep your nectar solution from freezing. 

One simple option is to install a Hummer Hearth Hummingbird Feeder Heater. The heater is an attachment for existing hummingbird feeders and consists of a red cup with a lightbulb inside, three adjustable elastic clips to hold it firmly against your feeder, and a 6ft cord to plug in to an extension cord or outlet. 


The Hummer Hearth is best suited to feeders with a flat base, to limit the potential for heat loss if it gets windy, but can be adjusted to work with almost any feeder. Check out this link to see if your feeder will work. When using the heater with any bottle style feeder, we recommend adding insulation to the bottle to help keep the heat in. If you are using a heater, you do have to change the nectar solution more often (2-3 times a week instead of 1-2) as the heat acts like the sun during summer and speeds up the fermenting process.

Other options to keep nectar from freezing include 
  • Switching between two feeders as one starts to freeze. It's effective as long as someone is around to do the switching. 

  • Pulling the feeder in at night and putting it out right before sunrise. Hummingbirds go into a torpor state (similar to hibernation but for much shorter periods of time) at night and wake up a little before dawn, immediately searching out nectar for the energy they need to survive the day. 

  • Incandescent Christmas lights wrapped around the bottle. Incandescent lights give off heat, and can help slow down or halt freezing in bottle style feeders. To make it even more affective, wrap the light-covered feeder in a layer of insulation. 

  • Insulating the feeder with bubble, wrap, woolen socks, or other insulation. Most effective at slowing down freezing, or helping to freeze at a slightly lower temperature than bottles without insulation. 

  • Hanging 40watt incandescent lightbulb directly above or below. Incandescent lights give off heat, and can help slow down or halt freezing in bottle style feeders. Can also put a dome above the light to help radiate heat down. 

  • Bringing it in closer to the house to soak up residual heat from your home. The closer the better, though it is a stopgap method and likely will just make the nectar take slightly longer to freeze and not stop it from freezing.
Warm but not hot nectar can be very helpful to hummingbirds when they are just waking up out of their torpor state. If the nectar is too cold, sometimes it can shock them back into the torpor, which is when you may go outside to find a hummingbird hanging by it's feet off your feeder. 
Questions? Give us a call at 250-390-3669 or email us at thebackyard@shaw.ca

Wednesday, 5 October 2022

Birds and Water


With the out of season dry weather, natural water sources for birds can be harder to find. If you're unable to have bird feeders set out, a simple, easy to maintain alternative is to put out some water. Having a source of fresh water for your backyard birds is a great way to attract more birds, especially with the recent dry weather. Not all birds will come to feeders but all birds need water, especially when natural water sources aren't as readily available.

A water source can be as simple as a shallow dish filled with water every morning. If you use a bird bath, make sure to choose one with a shallow dish and gently sloping sides. Birds can have issues judging water depth and like to wade in rather than jump. If your dish is deeper than 2", you can add some rocks to create shallower places for birds to perch. 

When placing your bird bath or shallow dish, keep in mind that birds find everything by sight and sound. Having your bath in an open area with trees or bushes 8-10ft away. The nearby shrubbery provides cover when necessary but is far enough away to let the birds find the water and spot predators easily. The nearby perching area also allows potentially waterlogged birds to have somewhere safe to dry off enough to fly. Having the cover any closer ca give predators somewhere to hide and make it more difficult for the birds to spot danger.

Adding a bird bath or other water source to your yard does not mean instant birds as they will need time to find it. Birds have great hearing, so adding the sound of moving water can help them find it faster. Additions such as drippers or bird bath fountains can make enough of a sound to draw birds in. A simple homemade solution to create this dripping sound is poking a hole in the bottom of a 2 liter pop bottle and hanging it above the feeder. Birds don't need a loud sound, this simple slow drip is enough to get their attention. 

When putting out a water source, keep in mind that you do need to clean it regularly. Once a week or more often if you notice it getting dirty. Using 1 part bleach with 9 parts water, or a 1 to 1 ratio of industrial white vinegar and water (cleaning vinegar found in hardware stores) to disinfect and clean feeders can help prevent the spread of disease among your backyard visitors.

Enjoy your birds!


Saturday, 10 July 2021

 Bird Feeding in Summer

With the summer heating up, you may be wondering about your bird's behavior in the new season. With such hot temperatures, you may even be concerned about their health and how they can stay cool. 

Typically, the amount of birds coming to your feeders will lessen during the warmer months. This is because there is a lot more natural seeds and insects for them to eat, and they will gravitate to this over seeds we provide. Whether or not you'd like to continue putting out seed is completely up to you, and there's absolutely no harm in providing seed over the summer. If you put out suet, be sure to use a higher quality suet over the summer. Low quality suet will often melt when it gets too hot, which can cause quite a mess! High quality suet will hold it's shape all summer. If you're storing suet, just be sure to keep it stored in a cool place. 

As for your hummingbirds, it's important to change the nectar more frequently when temperatures are high. The nectar will go bad a lot more quickly in the heat, so be sure to keep a close eye on it and clean your feeder! Don't be too concerned if you're not getting as many hummingbirds around as usual, as there is a lot more natural food for them in the summer. They'll be back at your feeders in swarms for the fall and winter. 

In your backyard, there are steps you can take to reduce the heat for the birds. You can move your feeders to a shady area, create spots for dust baths, and place out birdbaths or shallow dishes of water! Your birds will definitely appreciate it. 

Happy summer and happy birding!

Wednesday, 26 May 2021

What to do if you find a baby bird

What to do if You Find a Baby Bird 

It's nesting season, and lots of new baby birds are being brought into the world! This means that some of you may run into a baby bird by itself outside of it's nest, and this can be a confusing situation to be in. You want to help the bird, but you also want to make sure you do it in the safest way possible. And that's great! Here's a helpful info-graphic to help you take the right steps for different scenarios. 

Here are a few resources you can use if you need to contact help:

Call your local veterinarian's office for assistance and ask if they will accept it!
North Island Wildlife Recovery: https://www.niwra.org/
Wildlife Rescue Association: https://www.wildliferescue.ca/animal/bird/


Thursday, 7 January 2021

Surge of Pine Siskins at Backyard Feeders

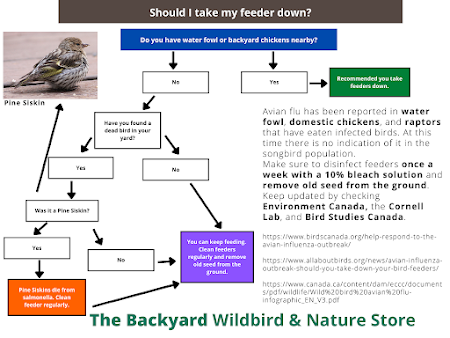
 A lot of backyard feeders are experiencing a surge of Pine Siskins visiting this winter. Pine Siskins do everything in a colony from nesting, feeding, traveling and also lots of squabbling. A problem common to birds that move in a colony is disease. As the birds are so close to each other diseases can pass through colony quickly.

The best way to help prevent disease around your bird feeders and water supplies is to clean your feeders regularly, at least every two weeks. A bleach solution of 1 part bleach to 9 parts water is a good all round cleaner for you bird feeders and bird baths. Also clean up any seed that is under the feeders weekly and move the feeder’s location periodically so the disease is not concentrated in one location.